
How to... Custom Eyes
When I bought safety eyes for the first time I bought them all in black, but a problem rose when I wanted to use them in a black amigurumi. The eyes would get lost on the doll's face, I had to find a way for that not to happen. That's what I'm going to share with you: How to turn a black safety eye into a blue eye with black pupil using the French knot.
The doll I was working on was for my mother and I wanted to give it to her on her birthday. I didn't have time to order some more, and at the time I was going to place the eyes I only had with me my Crochet on the Go supplies. Fortunately I had a skein of a really bright blue with me and the idea came to me:
What if I made the eyes with the blue yarn using the French knot technique I used to use in my cross-stitch? The blue really popped against the black but still something was missing. That's when I decided to give the eyes pupils.
If you want to know how, check out the following tutorial:
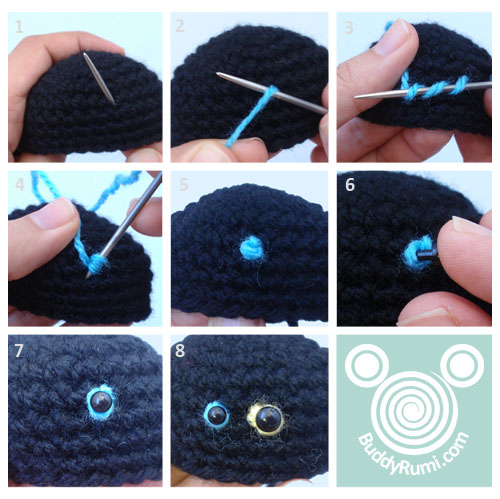
1. Insert the needle, from the inside of the doll to the outside, in the place where you want the eye to be. Pull the yarn to the front.
2. Grab the yarn and place the needle under it.
3. Wrap the yarn around the needle 2 to 3 times, always keeping the needle close to the doll.
4. Insert the needle into a different spot close to the one where the yarn came out.
5. Pull the yarn to the inside, without pulling it too tight. The French knot is now complete.
6. To create the pupil for the eye place a small safety eye in the center of the French knot and through the doll. Secure eye with washer.
7. A blue eye with pupil is created. For this eye I used a light weight yarn and a 4mm safety eye.
8. You can also create a bigger eye using a medium weight yarn and a 6mm safety eye (yellow eye). For this bigger eye I only wrapped the yarn 2 times around the needle.
Sorry for the delay in today's post but this was one of those days where everything seems upside down. =)
Happy I Love Yarn Day!!!!