
Free Amigurumi Pattern: Rudolph Christmas Reindeer
Oh wow! This is my first holiday season since BuddyRumi began and I never thought things would get so crazy! I heard about it, I read about it, but living it is a totally different thing!
I've been swamped in crochet this month! The hook is practically a sixth finger by now!
Today I bring you the pattern for Rudolph, the cutest reindeer ever!
Materials
Light weight yarn in brown
Light weight yarn in dark brown
Light weight yarn in red
Light weight yarn in white
2,5mm hook /UK 12
Stuffing
1 pair of 6mm safety eyes
Tapestry needle
Optional: Golden thread
Abbreviations
Rnd: round, rounds
st: stitches
ch: chain
sl st: slip stitch
sc: single crochet
dc: double crochet
inc 2: increase by working two stitches in the same stitch
inv dec 2: decrease by using the invisible decrease method
Finished size: 11cm / 4,33 inches
Skill level: Easy
About: The terminology used in this pattern is the US terminology. Gauge is not important.
Eyes (make 2)
Using the white yarn and the 2,5mm hook.
The eyes are worked in continuous rounds. Don't join rounds at the end. You may want to use a marker to indicate the beginning of the round.
All stitches are worked in both loops.
Rnd 1: 8sc in Magic Ring (8st)
Rnd 2: [2sc, (inc 2dc x 2)] x 2 (12st)
- Sl st to 1st, needle join and leave long tail.
Head
Using the brown yarn and the 2,5mm hook.
The head is worked in continuous rounds. Don't join rounds at the end. You may want to use a marker to indicate the beginning of the round.
All stitches are worked in both loops.
Rnd 1: 6sc in Magic Ring (6st)
Rnd 2: (inc 2) x 6 (12st)
Rnd 3: (1sc, inc 2) x 6 (18st)
Rnd 4: (2sc, inc 2) x 6 (24st)
Rnd 5: (3sc, inc 2) x 6 (30st)
Rnd 6: 30sc (30st)
Rnd 7: (4st, inc 2) x 6 (36st)
Rnd 8-9: 36sc (36st)
Rnd 10: (5sc, inc 2) x 6 (42st)
Rnd 11-20: 42sc (42st)
- Place eyes (with safety eyes) between rounds 14 and 15
Rnd 21: (5sc, inv dec 2) x 6 (36st)
Rnd 22: (4sc, inv dec 2) x 6 (30st)
Rnd 23: (3sc, inv dec 2) x 6 (24st)
Rnd 24: (2sc, inv dec 2) x 6 (18st)
Rnd 25: (1sc, inv dec 2) x 6 (12st)
Rnd 26: (inv dec 2) x 6 (6st)
- Close and weave in ends
Ears (make 2)
Using the brown yarn and the 2,5mm hook.
The ears are worked in rows. All stitches are worked in both loops.
Row 1: 3sc in Magic Ring (3st)
Row 2: (inc 2) x 3 (6st)
Row 3: (1sc, inc 2) x 3 (9st)
Row 4: (2sc, inc 2) x 3 (12st)
Row 5: (3sc, inc 2) x 3 (15st)
- Finish off and leave long tail
Shaping the ears:

1. Finished half circle at the end of Round 5.
2. Fold the half circle in half.
3. Thread the tail left at the end of Round 5 in a tapestry needle. Insert the needle behind both loops of the stitches at the base of the half circle.
4. Sew the straight part of the half circle together.
5. Finished ear. Do not cut the end, use it to attach the ear to Rudolph's head.
Nose
Using the red yarn and the 2,5mm hook.
The nose is worked in continuous rounds beginning with a chain to give it an oval appearance. Don't join rounds at the end. You may want to use a marker to indicate the beginning of the round.
All stitches are worked in both loops.
Ch 4
Rnd 1: inc 2 in the 2nd ch from hook, 1sc, 3sc in the last st. 3sc (9st)
Rnd 2: 1sc, inc 2, 2sc, inc 2, (1sc, inc 2) x 2, 2sc (15st)
Rnd 3: 15sc (15st)
- Sl st, needle join and leave long tail.
Antlers
Using the dark brown yarn and the 2,5mm hook.
All pieces of the antlers are worked in continuous rounds. Don't join rounds at the end. You may want to use a marker to indicate the beginning of the round.
All stitches are worked in both loops.
Base (make 2)
Rnd 1: 8sc in Magic Ring (8st)
Rnd 2-7: 8sc (8st)
- Sl st, needle join and leave long tail.
Long Pieces (make 4)
Rnd 1: 8sc in Magic Ring (8st)
Rnd 2-9: 8sc (8st)
- Sl st, needle join and leave long tail.
Tips (make 8)
Rnd 1: 8sc in Magic Ring (8st)
Rnd 2-4: 8sc (8st)
- Sl st, needle join and leave long tail.
Antlers' assembly:

Attach the pieces together as shown in the picture.
Assembling Rudolph
- Attach the white part of the eyes to the head in order to "open it".
- Attach nose to the head.
- Attach antlers to the head.
- Attach ears to the head.
- Sew mouth.
- Attach the golden thread to the top of the head to be able to hang Rudolph.
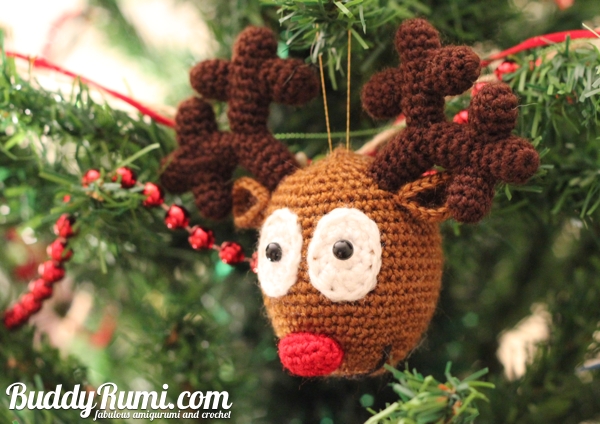
Now Rudolph is ready to celebrate the holidays with you!
Happy crochet and happy holidays!
This pattern is an original pattern by Ana Rosaof BuddyRumi. Please do not claim this pattern as your own. You may keep a copy for your own personal use and feel free to use the items made from this pattern however you wish, but remember to credit me as the pattern designer. Please do not reproduce this pattern anywhere else, if you wish to share it post a link to/blog/2012/8/27/kitty-got-my-key-free-pattern.html
Thank you!